What Are Odoo Automation Rules?
Odoo allows users (with the appropriate access rights) to create automation rules that eliminate a lot of manual actions and enable processes automation. Let's say a sales manager should be automatically notified whenever an order above a certain threshold is secured, a correctly set-up automation rule would do precisely that.
How To Create Automation Rules?
There are three ways to create an automation rule. Before you begin, it is recommended to enable developer mode as this allows access to additional options.
Using Studio
This is the recommended method as you can directly create automation rules from any Odoo module.


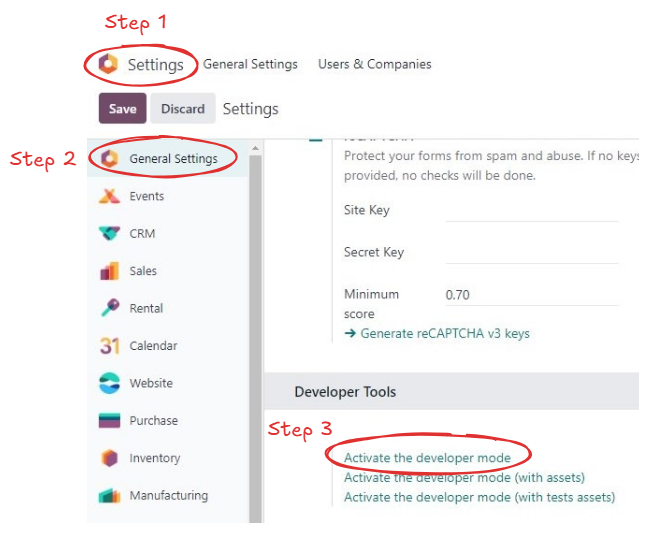
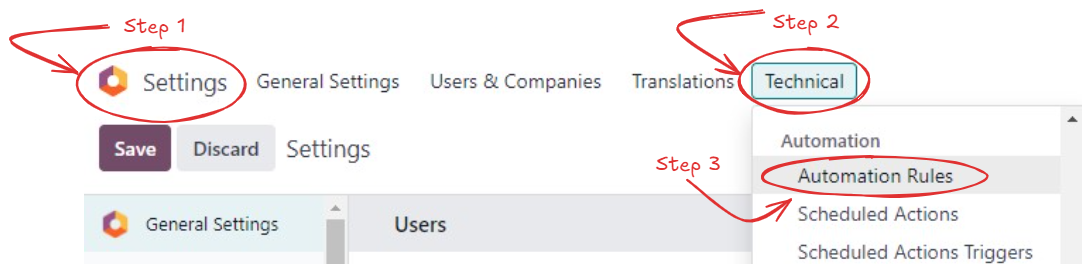
From Settings
Ensure that developer mode is enabled. Adding new automation rules this way requires selecting the model for the automation. This method is useful for viewing all available automations and editing them as required.
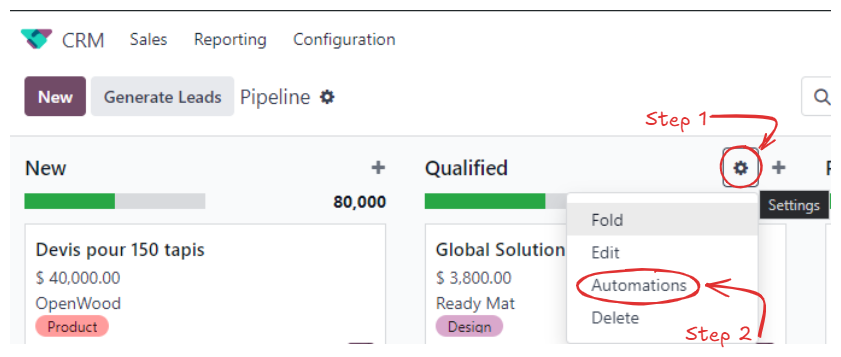
From Kanban Views
This method is only available in grouped kanban view, for example, in the CRM opportunity pipeline.
Components of Automation Rules
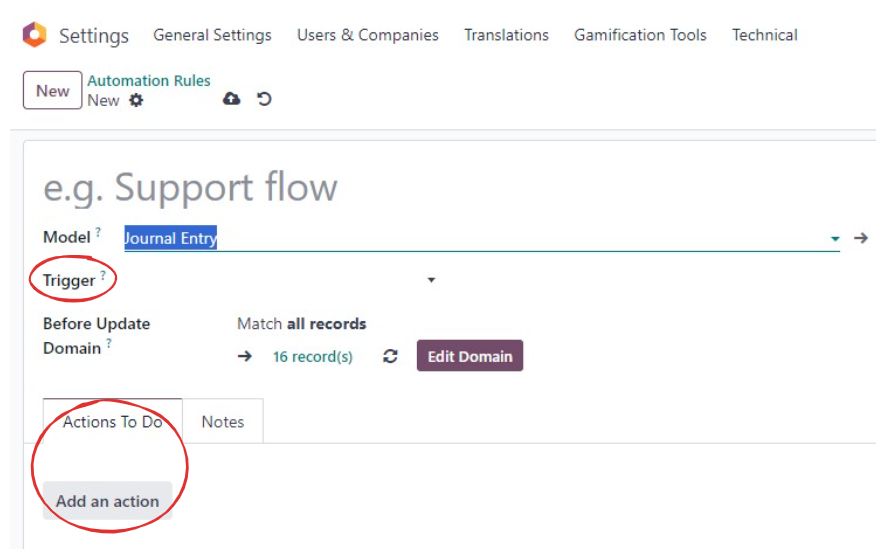
- An automation rule can only be created for a specific model.
- The Trigger specifies when the automation rule should run.
- The action specifies what needs to happen once the rule runs.
Action
Let's discuss action first, as this is the primary purpose of the automation rule. There are ten types of actions available, and details of the action depend on the type selected. It is possible to set multiple actions on a single automation rule.
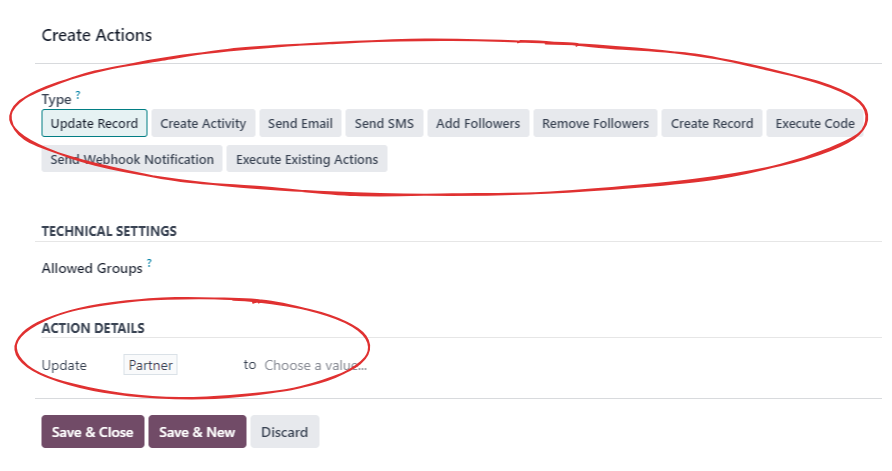
- Update Record
This action is commonly used to update or compute a field using python. For example, you can change sales person to the user creating the order.
- Create Activity
Another useful action allows you to automatically create an activity, such as a follow-up email a few days after sending a quotation to the customer.
- Send Email / SMS
As name suggests, this action type allows you to send an automatic email or SMS based on the selected template.
- Add / Remove Followers
Followers can be other users of the database or even contacts such as customer. Setting followers allows them to be notified of any changes or actions on the record. This action type can add or remove followers.
- Create Record
Another powerful action that can even create another record, such as an approval request for a journal entry.
- Execute Code
This action allows you to run python code specified in the action details
- Send Webhook Notification
Webhooks are a new functionality in Odoo 17 that allow Odoo to communicate with external systems.
- Execute Existing Actions
Finally, this action allows to run one or more existing automation rule(s).
Trigger
Trigger is what runs the automated rule. It's easy to set up incorrect triggers, thereby running the automation rule in unintended scenarios. It is crucial to test your trigger logic rule in a test system before using the automation. Lets say, you want to add a tag to a customer when an order above a certain amount is placed, if the logic is set up incorrectly, all orders could start placing that tag on customers.
Before Update Domain
Before discussing trigger types, let me explain the "before update domain" field.
1. Enable developer mode to see this option.
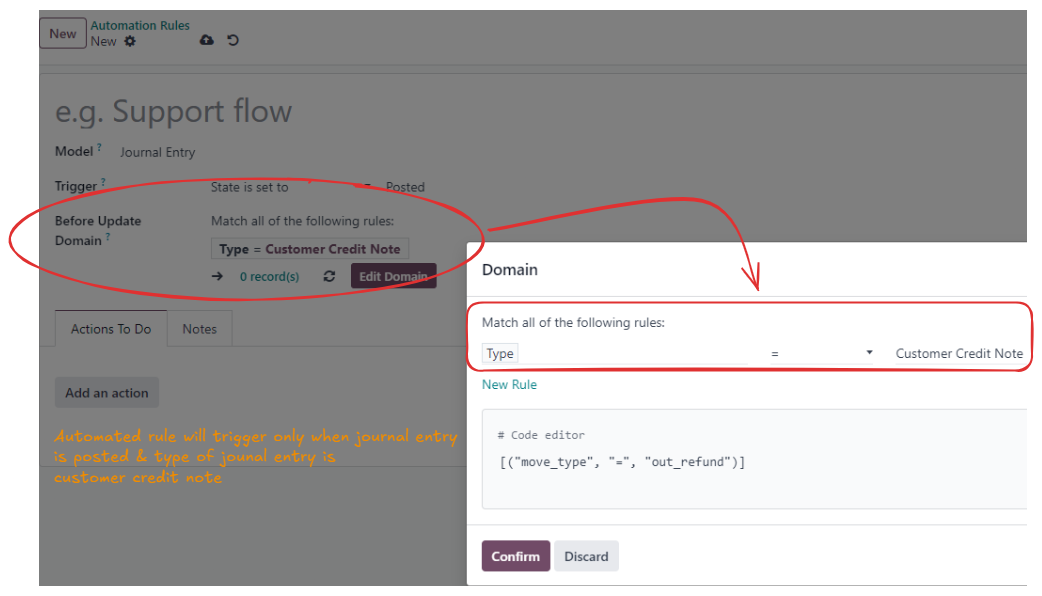
2. A domain in Odoo is used to filter records based on defined criteria. Therefore, this criteria must be met for the automation rule to run.
For example, if we are setting up an automation rule for journal entry type "Customer Credit Note" and before update domain value is "match all records", the automated rule will run every time a journal entry is created, regardless of the journal entry type. This can adversely impact system performance if the rule runs more often than needed. To fix this, you should add a domain (filter) so that it applies only to "Customer Credit Note" entries
TRIGGER TYPES
The available trigger types depend on the selected model.
- Values Updated
Triggers the automation rule when a value is set, for example, when the state of a quotation is set to "Sales Order".
- Email Events
Triggers the automation once an email is sent or received.
- Timing Conditions
Triggers the automation when a defined time-based condition is met.
- Custom
Triggers the automation once a record is saved, deleted or a field is changed. "On save" is the type you are likely to use most.
- External
Triggers the automation on webhook.
EXTRA CONDITIONS / APPLY ON / WHEN UPDATING
Some trigger types have additional fields like "Extra Conditions" and "Apply On," which allow you to set further filters. You might wonder why these are needed if you've already used the "before update domain" to restrict the triggering of the automation rule.
In essence, the "before update domain" checks conditions to decide if the automated rule should run. Once it does, "extra conditions" and "apply on" determine if the specified action should be performed.
When Updating allows you to specify fields that are tracked for changes, and the action is performed only if these fields are changed. If left blank, a change in any field would execute the action.
How to Check if Rule Triggers as Intended
To check if the rule triggers as intended, set the action to "Execute Code" and use the following code:
raise UserError("Automated Rule Triggered")
This is only for testing and once trigger is tested, replace it with the intended action.
EXAMPLE 1
On a contact we need an action once a salesperson is set but only if there already was one beforehand (I used above test code as action in this example). If the salesperson was blank automation rule should not run.
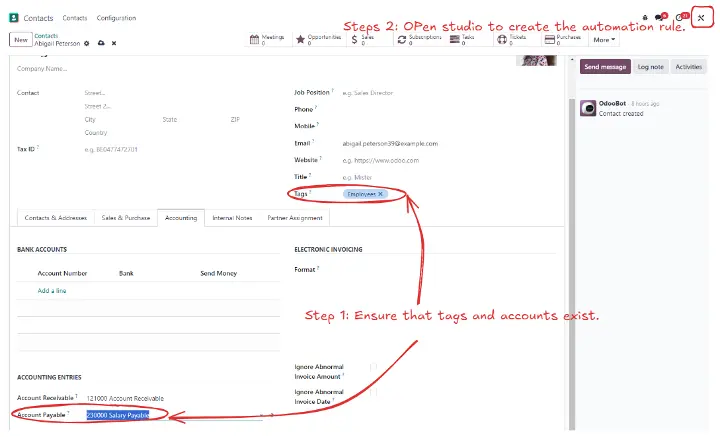
EXAMPLE 2
Next we need a different accounts payable set if the contact has an employee tag.
Notes
- Please test thoroughly on records where you expect the automation rules to apply and where you do not expect it to trigger to validate that automation is setup properly before deployment to a production system.
- This blog is based on Odoo version 17. For other versions, please refer to Odoo Documentation and choose the appropriate version.
Happy automating, 😀